


")


LEGAL DISCLAIMER*
*Building an Obstacle Wall with power tools is dangerous and proper safety procedures should be followed. Using an obstacle wall is also dangerous. Falling off could cause injury including, but not limited to – broken bones, concussion, heart attack, spinal injury, paralysis, and even death. Be sure to consult local zoning laws and comply with all building codes in your area. Build and use an obstacle wall at your own risk. Joel “Dirty” Getty aka “Velocinaut”, Inside Obstacle News, Cataclysm Sports LLC, and Mud and Adventure LLC assume no responsibility for any injury or death to any person(s), occurring while building, using, or storing this obstacle wall and make no claims as to the safety of this wall. Construction techniques and materials may vary and you assume all risk and responsibility when following this guide. Consult your doctor before performing strenuous obstacle training. Enjoy!
Intro to Obstacle Wall Construction

Building your own obstacle wall is a great way to gain experience and build obstacle specific skills during your OCR and mud run training, but not everyone is an engineer or a carpenter, so here’s a guide and video from Dirty Getty of Inside Obstacle News that will show you how to build an obstacle wall. The obstacle wall shown here was designed for multiple purposes and cost under $300 (not including tools), but you can easily modify your own wall to suit your obstacle training needs.
Features
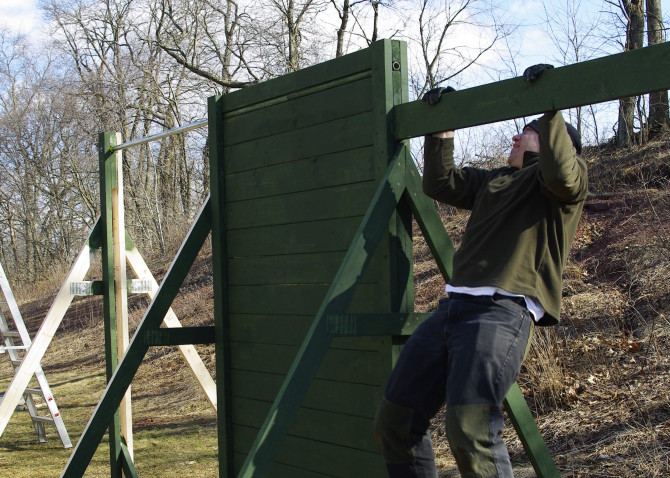
Main Obstacle Wall – The backbone
The main part of the wall is just over 8 feet high and 5 feet wide. This is because all but one of the 2x6x10’s were cut in half to create double the 2x6x5’s and lower the cost. You could widen your wall by using 8 foot long boards and not cutting them, but that will increase your cost by about 30%. Using 6 inch wide boards was calculated to give the highest obstacle wall at the lowest cost. You can also make a shorter wall by trimming down the vertical 2x4x8’s on each side of the wall, but most walls encountered while racing in obstacle races and mud runs are around eight feet and hey, you want to challenge yourself, right? Building an Obstacle Wall taller than 8′ could present some safety and engineering issues, so I don’t recommend it unless you are an experienced racer/contractor/carpenter/structural engineer/architect …..(you get the picture). Finally, there’s a gap at the bottom for crawling under. A great addition to any workout is 10x over/unders on your wall.

Pull-up bar
The optional pull-up bar shown is very sturdy and designed to support a lot of weight compared to a pipe just sticking out of the side (Hobie’s Wall), but is slightly more technical to build. The good thing about this, besides having an extra pull-up bar outside, is that you can work on muscle-ups that are not usually possible on indoor bars.
Accessory Hanger
Adding this accessory hanger is as easy as leaving one of your 2x6x10’s uncut so that it sticks out of the side of the wall. This is useful for hanging a spear target for spear throw practice, or for doing finger tip pull-ups. There is a lot of room for creativity here, if you want to sink eyelet screws on the bottom side for hanging anything from ropes for grip strength, to tires, and even an outdoor solar camping shower for rinsing off after an aggressive workout.
Materials List
(14) 2X4X8
(9) 2X6X10 (save time by having the lumber store cut 8 of these in half)
(3) 4x4x8 (treated is best because these make up the base and could rot otherwise)
(3) 6″ x 3/8th Bolts with matching Nuts
(6) Rubber Washers
(3) Metal Washers
(14) Connector Plates (for the angle trusses)
(6) Angle braces (for the bases of each wall support)
(1) 10 foot x 1″ steel pipe (use 1 1/2 ” pipe if you want a thicker pipe for pull up bar, don’t use thin conduit here)
1 Gallon Exterior Paint (whatever color you want, I chose hunter green to blend in with my property)
Big box of 2 1/2″ Exterior Decking screws
Tools:
Circular Saw
Drill (1/2″ Metal Drill bit)
Cordless Drill (Screwdriver bit)
Hammer
Safety Glasses!!!!
T-square and level are useful too
Watch the Video
Build It!
To build your obstacle wall follow the steps in the video which would be boring and confusing to read about. Basically, you build the main wall section from the 2x4x6’s and join them at the edges with the 2x4x8’s. Don’t forget to add the pull-up bar and accessory hanger during the wall construction. The triangle trusses are built with the treated 4x4x8’s on the bottom and the connector plates to form the angles. Once the wall is built, add the triangle trusses using the brackets. The side truss for the pull-up bar is added last and bolted to the far end of the bar and then covered by the end 2x4x8. See, Confusing! Watch the video instead.
Building your obstacle wall may be a challenge, but you will have an awesome training tool to use that, when painted with exterior paint, will last for years and years once you are done, and it doesn’t take up a lot of space in your yard.
All Photos and Video are property and copyright 2013 Inside Obstacle News a division of Cataclysm Sports LLC and used here by permission for Mud and Adventure LLC.
//


Approximately how much did this cost to make?